Role-based access control (RBAC)
Role-based access control (RBAC) is a proven authorization model that maps real-world business actions to roles and permissions. This guide covers how RBAC works in Logto, practical design patterns, and best practices for building secure, scalable SaaS applications.
What is RBAC?
RBAC lets you manage who can do what in your application by grouping permissions into roles. Users and clients are assigned one or more roles, which grant the permissions needed to access features, APIs, or data.
Core concepts
- Role: A named set of permissions (e.g.,
admin,viewer,billing-manager). - Permission: An action or right (e.g.,
manage:members,view:analytics). - Scope: A synonym for permission, commonly used in OAuth 2.0 contexts.
- API resource: An API, endpoint, or service to which permissions apply.
- User/Client: The entity assigned roles (end users or machine-to-machine (M2M) apps).
In Logto (and OAuth 2.1), “permissions” and “scopes” refer to the same concept and are used interchangeably throughout this documentation.
API resources
An API resource is any protected endpoint or service in your application—such as a REST API, GraphQL endpoint, or other backend service requiring authorization.
Logto models API resources following RFC 8707: Resource Indicators for OAuth 2.0.
Each API resource is uniquely identified by a resource indicator (a URI), which is used to scope access tokens and enforce audience restrictions.
| Property name | Description | Required |
|---|---|---|
| API Name | A human-friendly name to identify the API resource in the Console and logs. | Yes |
| API Identifier | The unique resource indicator URI that represents the API resource. | Yes |
| Token expiration time | The lifetime of issued access tokens for this API (in seconds). Default is 3600 (1 hour). | No |
| Default API | Only one API resource can be set as the default per Logto tenant. When set, the resource parameter can be omitted from auth requests. | No |
When a default API resource is designated, Logto will use it as the audience for tokens when the resource parameter is omitted in authentication requests.
Default API resource behavior
In Logto, every user-defined global permission (scope) must be linked to an API resource. Otherwise, the permission is treated as an OpenID Connect (OIDC) scope.
This generally doesn’t impact most integrations, but when working with third-party apps that do not support RFC 8707, the initial authorization request may not include a resource parameter. In these cases, Logto issues opaque access tokens instead of JWTs, which can complicate access control.
To solve this, you can set a default API resource for your tenant:
- When the
resourceparameter is missing in the Authentication request:- Logto uses the default API resource as the audience for access tokens.
- If the
openidscope is included:- Logto issues an opaque access token for the Userinfo endpoint when no
resourceis present in the token request.
- Logto issues an opaque access token for the Userinfo endpoint when no
- If the
openidscope is not included:- Logto issues a JWT access token for the default API resource as the audience.
Setting a default API resource ensures smoother integration with apps that do not support RFC 8707, while maintaining secure and standards-based access controls.
RBAC in Logto
Logto provides flexible RBAC at both the global and organization levels to support multi-tenant SaaS:
- Global roles Assigned across the Logto tenant. Ideal for product-wide permissions, admins, or superusers.
- Organization roles Assigned within an organization. Perfect for organization-specific access, such as workspace admins, project members, or custom groups.
- API resources Registered APIs and features that require authorization.
- Permissions (scopes) Defined per API resource or in the organization template.
- API resource permissions can be assigned to either global or organization roles.
- Organization permissions can be assigned only to organization roles.
Depending on your product’s needs, you can use these RBAC models separately or in combination.
Below are three illustrative examples with diagrams:
Model 1: Global API resources
Scenario
A SaaS product with APIs shared across all users, regardless of organization. Use global roles to control access to product-wide API resources.
Diagram
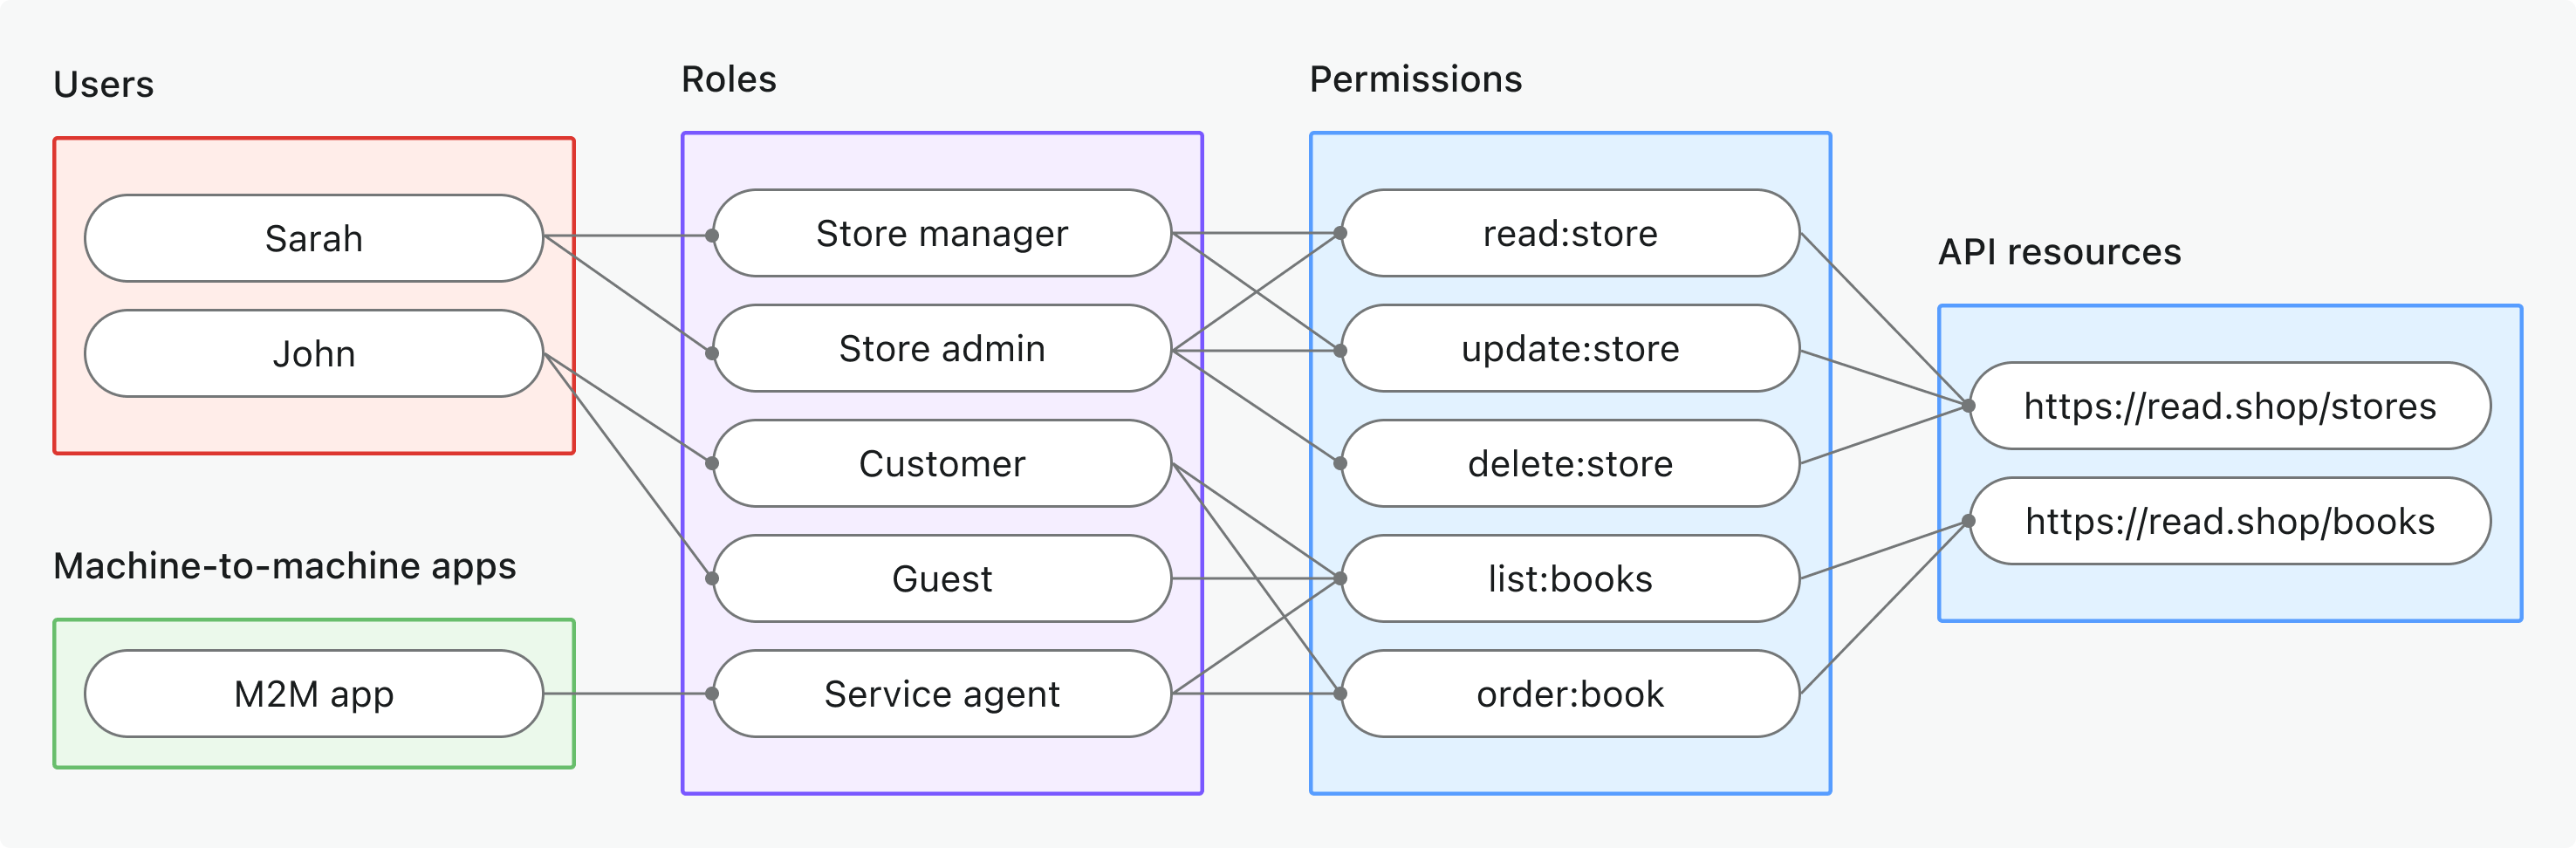
Key points
- Users and M2M apps are assigned global roles (e.g., Store manager, Service agent).
- Roles grant permissions (scopes), such as
read:store,order:book. - Permissions are linked directly to API resources (e.g.,
https://read.shop/stores).
When to use
When access is not organization-specific or users/clients operate across all organizations.
Logto doesn't support non-API permissions at the global level since it is reserved for OpenID Connect (OIDC) scopes.
For step-by-step implementation guide, see Protect global API resources.
Model 2: Organization (non-API) permissions
Scenario
Controlling in-app features or workflows that aren’t enforced at the API layer (such as gating UI features, dashboards, or internal tools) using organization roles and permissions.
Diagram
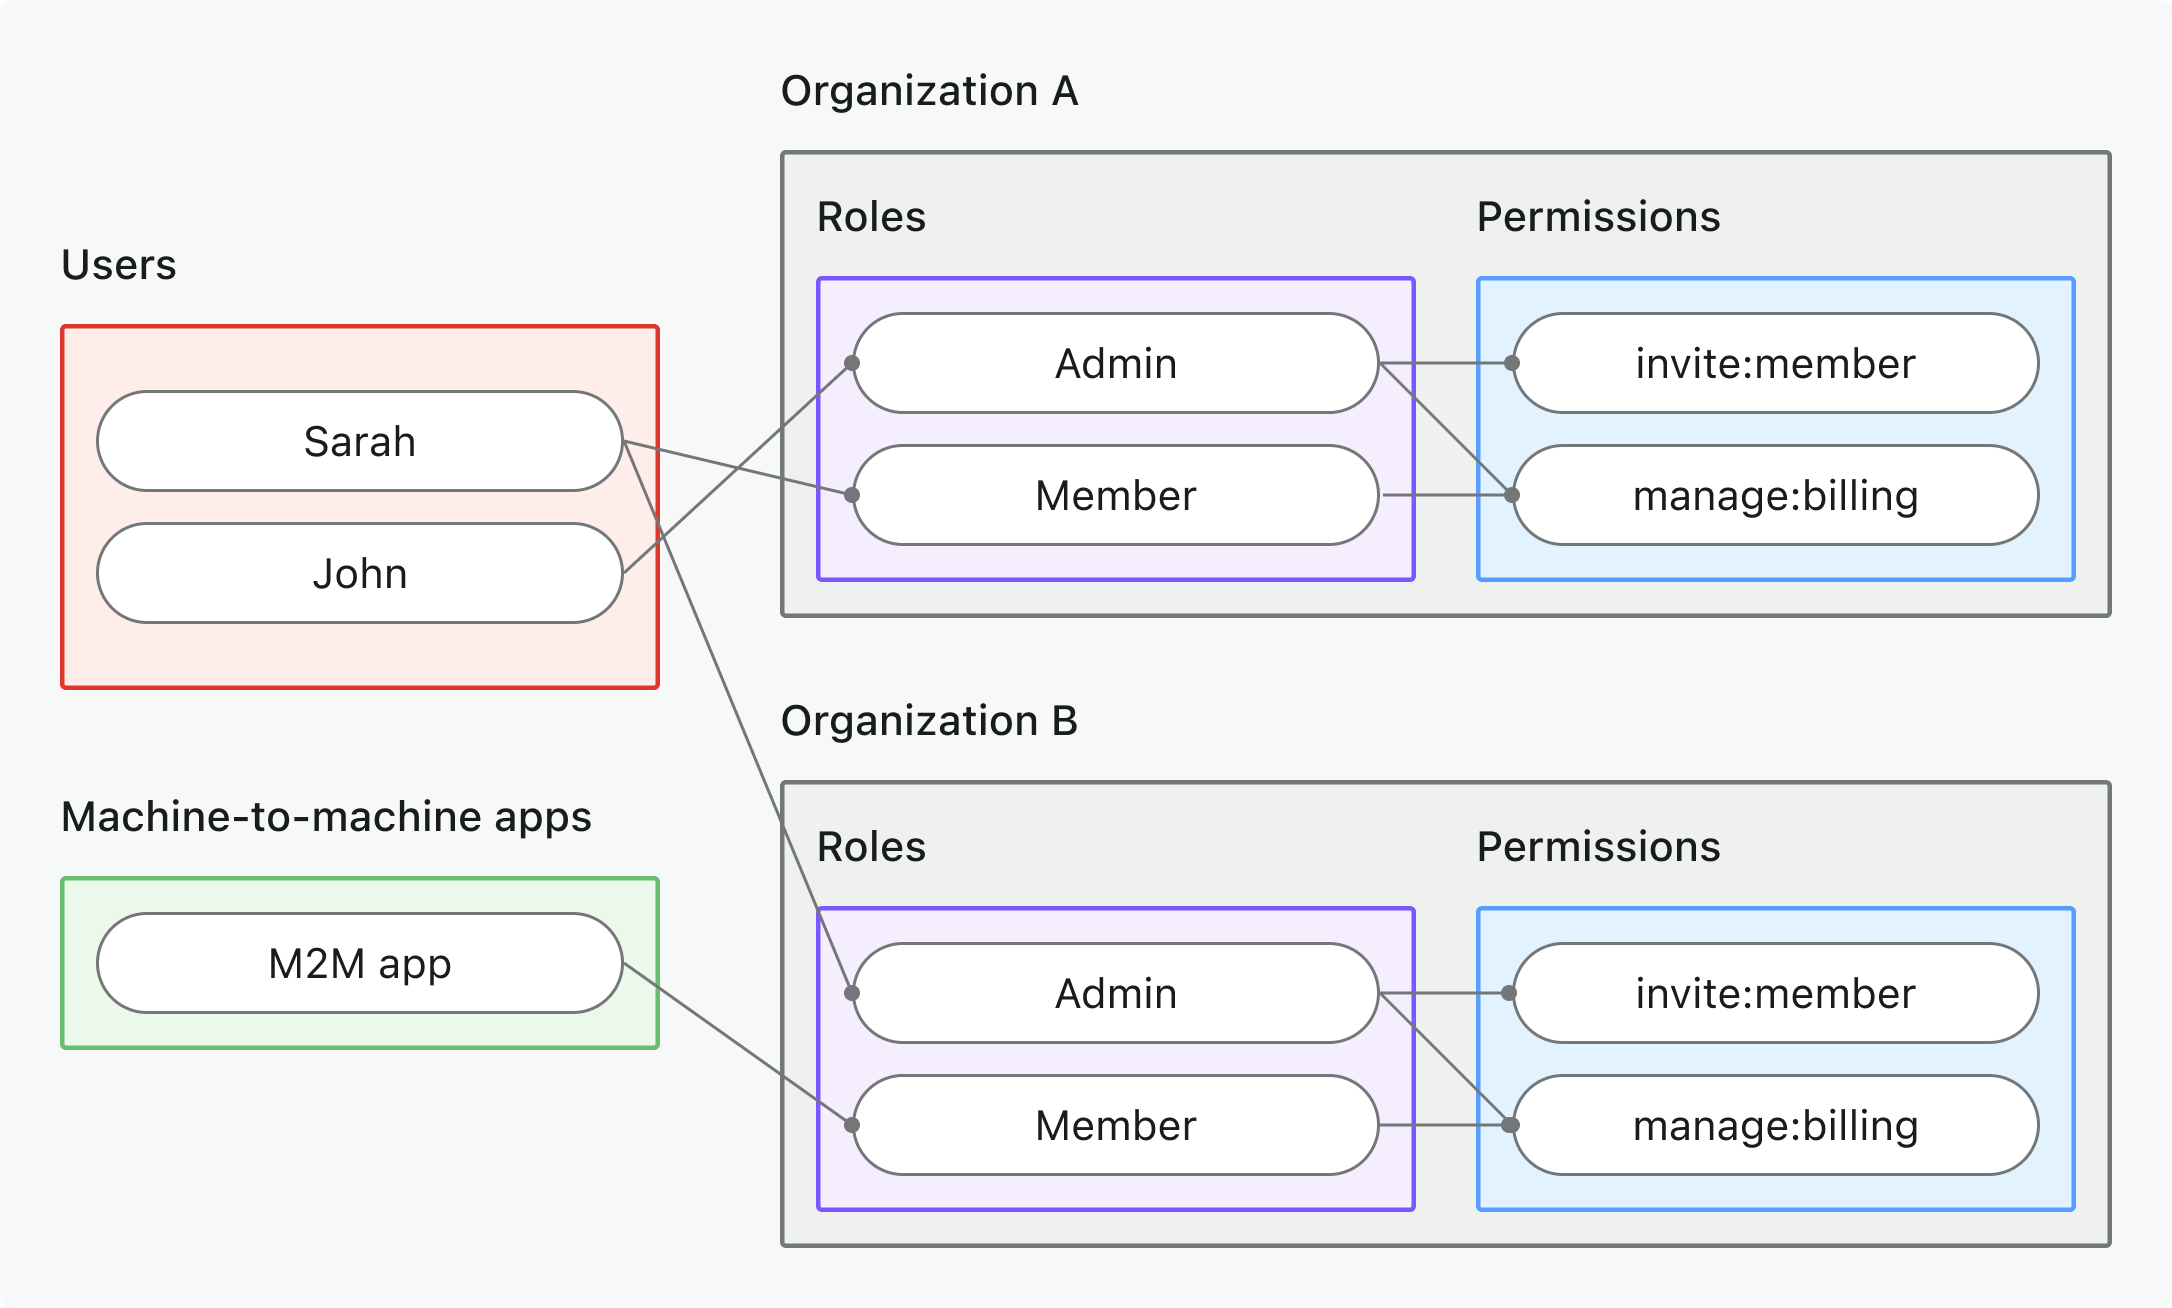
Key points
- Each organization (A and B) has its own assignments, but all organizations share a common set of roles defined in the organization template.
- Users and M2M apps can have different roles in each organization.
- Organization roles (e.g., Admin, Member) grant organization permissions like
invite:member,manage:billing. - Permissions are enforced in the app’s UI or business logic, not by the API gateway.
When to use
When you want to manage who can see or use features inside an organization when API-level enforcement isn’t needed.
For step-by-step implementation guide, see Protect organization (non-API) permissions.
Model 3: Organization-level API resources
Scenario
A multi-tenant SaaS platform where each organization has its own members, data, and roles. Use organization roles to grant API access within each organization.
Diagram
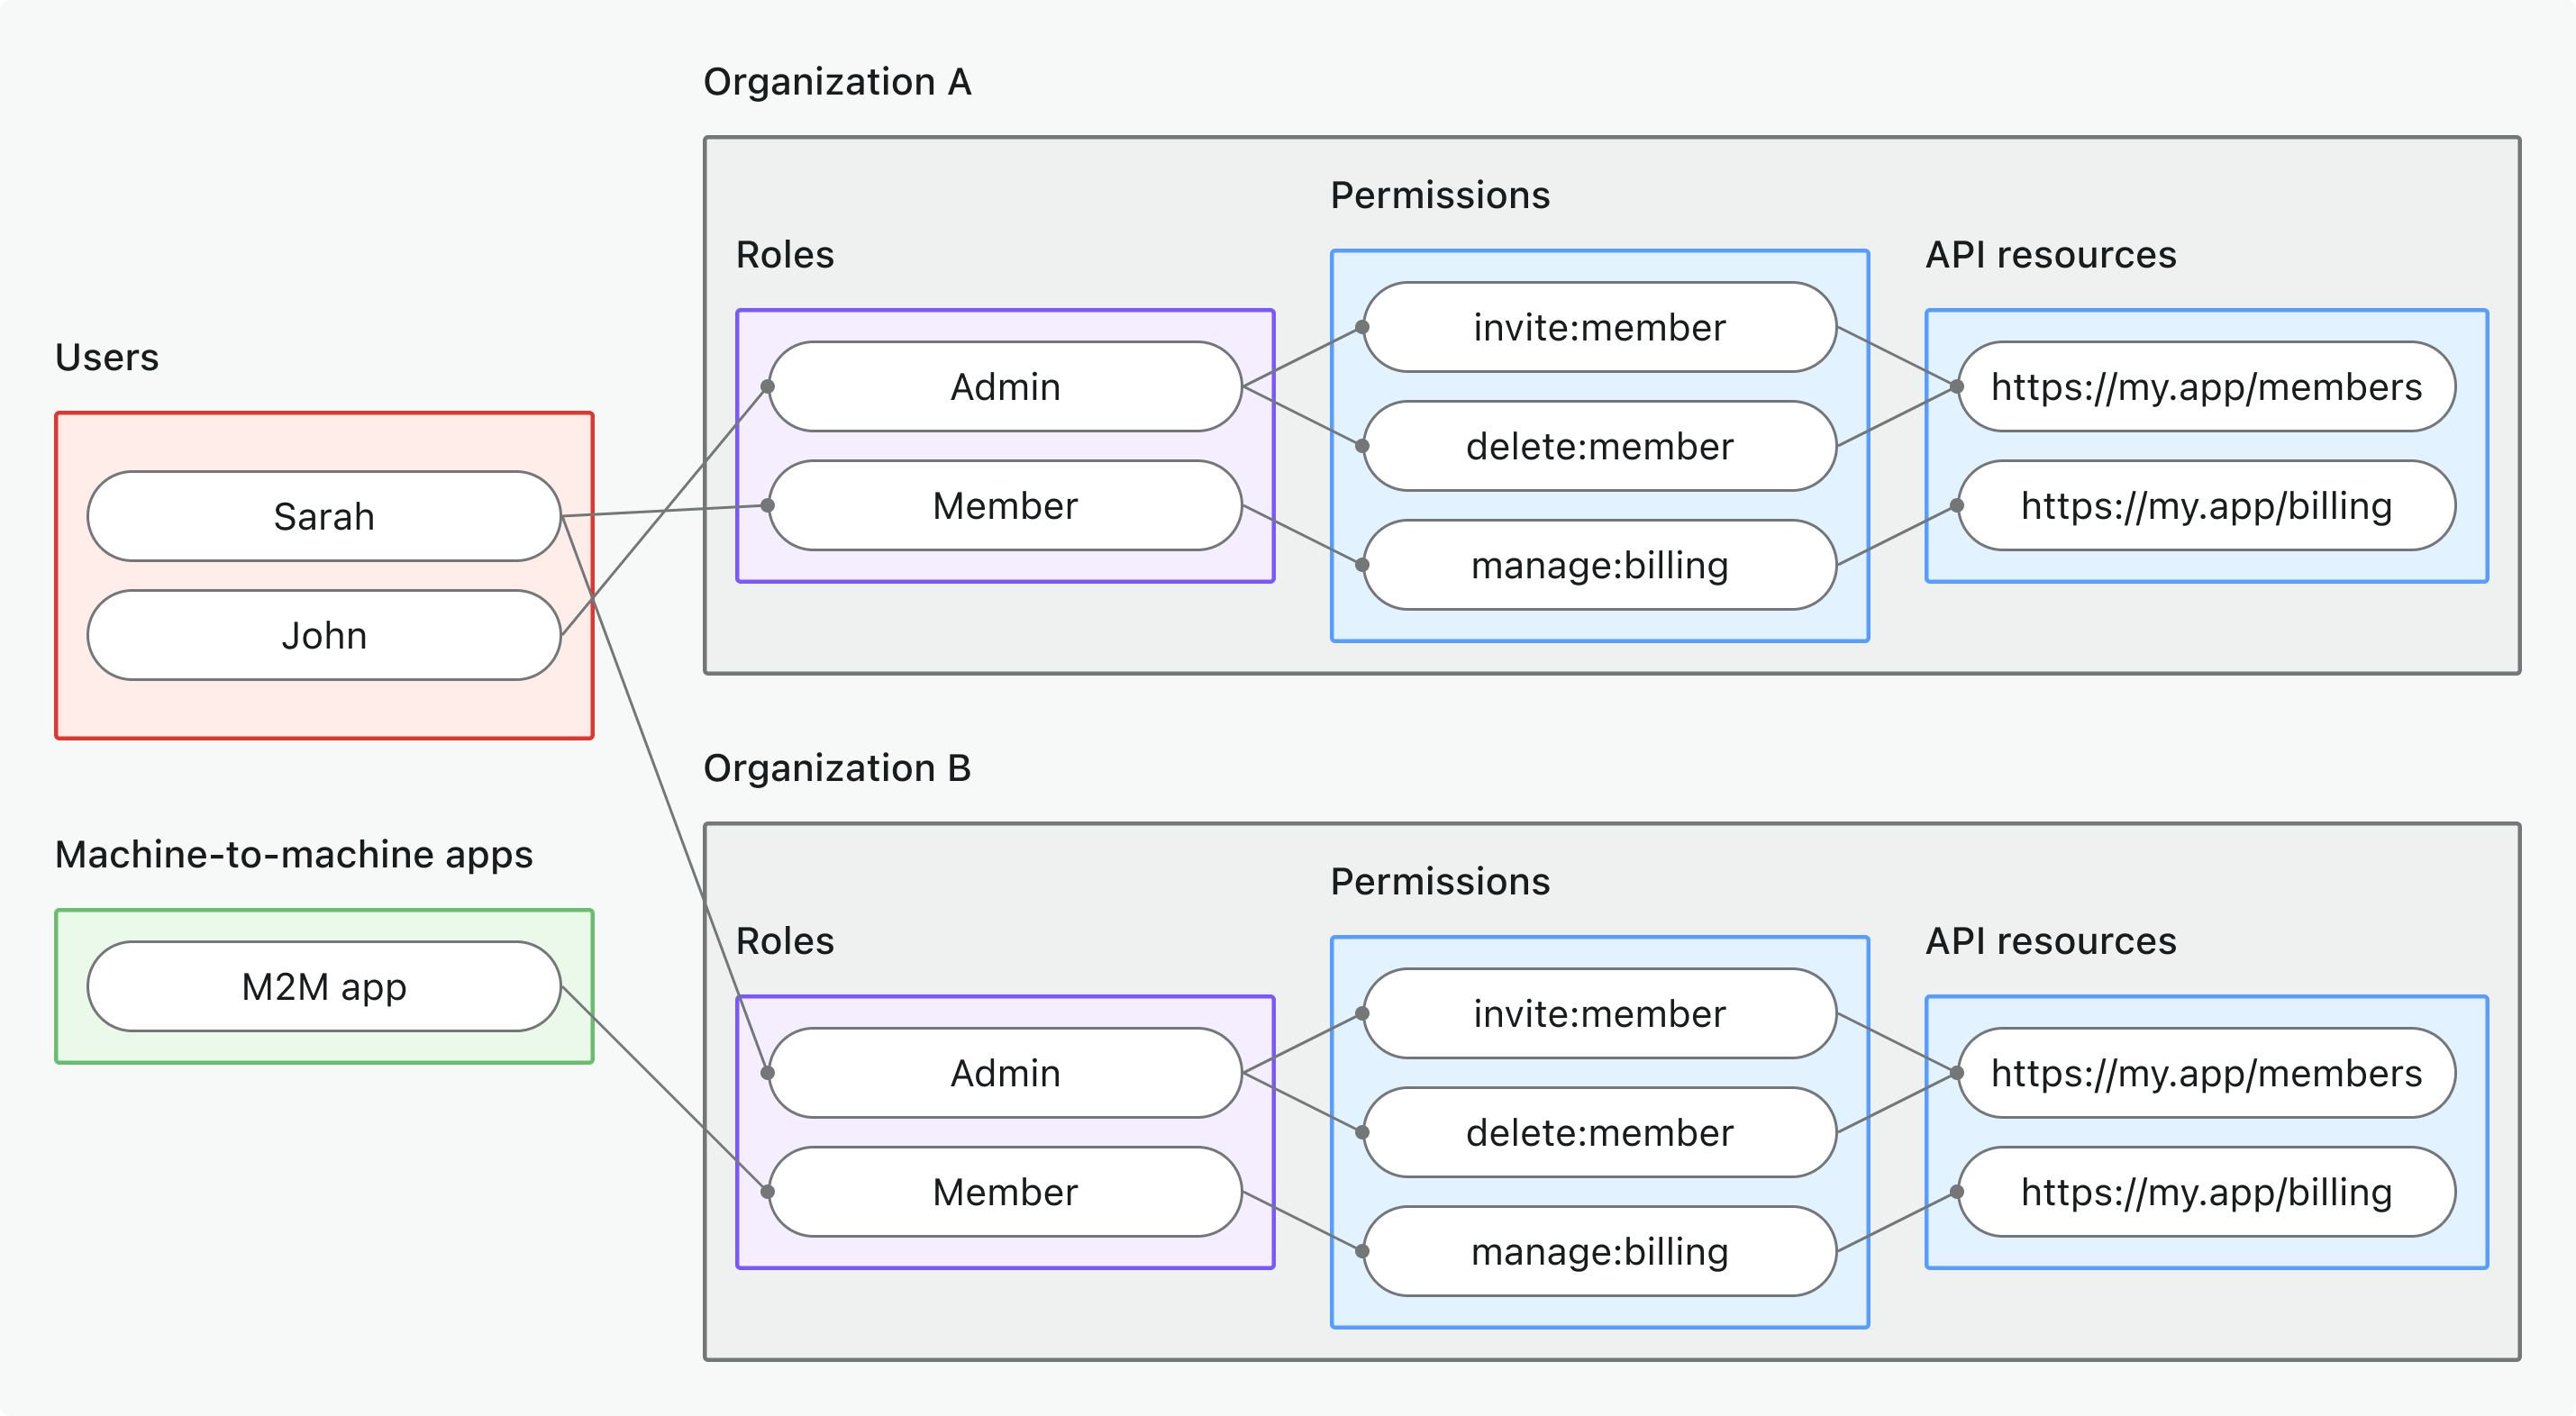
Key points
- Each organization (A and B) has its own assignments, but all organizations share a common set of roles defined in the organization template.
- Users and M2M apps can have different roles in each organization.
- Permissions (scopes), such as
invite:member,manage:billingare linked to API resources. - Permissions are enforced at the API level when the access token includes an organization context.
When to use
When you need to control API access based on organization context, such as allowing users to manage their own organization’s data.
For step-by-step implementation guide, see Protect organization-level API resources.
Design and implement a permission model
According to your product’s architecture and user needs, you can choose a suitable RBAC model from the examples above. Here’s a cheat sheet to help you design and implement your permission model effectively:
| Permission model | Define API resources with permissions? | Define organization permissions? | Use global roles? | Use organization roles? |
|---|---|---|---|---|
| Global API resources | ✅ | n/a | ✅ | n/a |
| Organization (non-API) permissions | n/a | ✅ | n/a | ✅ |
| Organization-level API resources | ✅ | n/a | n/a | ✅ |
Define API resources with permissions
Register your APIs in Logto Console or via Management API to define the API resources and their permissions (scopes).
In OAuth 2.0 and OIDC, an “API resource” is technically called a resource indicator, a unique URI that identifies your protected API or service.
Register API resources with permissions in Logto Console
-
Go to Console → API resources.
-
Click Create API resource.
-
Provide:
- API name: Human-readable name for your API.
- API identifier: API resource indicator (e.g.,
https://api.yourapp.com/org).
-
In the Permissions tab, click Create permission to create permissions (scopes) for this API resource.
-
In the General tab, you can optionally set the following:
- Token expiration time: Set how long access tokens for this API resource are valid. We recommend keeping it short (e.g., 1 hour) for security.
- Default API: Designate this API resource as the default for audience-restriction and token issuance if no
resourceis specified in the OAuth request. This is optional and can be useful for clients that do not support theresourceparameter (for example, some third-party tools or plugins).
Tips
- Map API resource indicators to the real API endpoints to provide intuitive names.
- For example,
https://api.example.com/v1/users.
- For example,
- Use clear, action-based naming (e.g.,
invite:member,manage:billing,view:analytics).- Alternatively, some genre may prefer a prefix or group by feature for clarity (e.g.,
billing:read,billing:manage).
- Alternatively, some genre may prefer a prefix or group by feature for clarity (e.g.,
- Keep permissions business-driven, not just technical endpoints.
Example
| API resource indicator | Permission | Description |
|---|---|---|
https://api.example.com/users | invite:user | Invite new users |
https://api.example.com/users | manage:user | Update or delete users |
https://api.example.com/billing | view:billing | View billing details |
https://api.example.com/billing | manage:billing | Edit billing settings |
Define organization permissions
Register organization permissions in Logto Console or via Management API to define permissions that apply within each organization. Organization permissions are defined in the organization template.
Register organization permissions in Logto Console
- Go to Console → Organization template → Organization permissions.
- Click Create organization permission.
- Provide:
- Permission name: A clear, action-based name for the permission (e.g.,
invite:member,manage:billing). - Description: A brief description of what the permission allows (e.g., "Invite new members to the organization").
- Permission name: A clear, action-based name for the permission (e.g.,
- Click Create permission to save.
Tips
- Use clear, action-based names (e.g.,
invite:member,manage:billing). - Keep organization permissions distinct from API permissions to avoid confusion.
Example
| Organization permission | Description |
|---|---|
invite:member | Invite new members to the organization |
manage:billing | Edit billing settings for the organization |
Configure global roles
Create and configure global roles in Logto Console or via Management API to group permissions that apply across the entire Logto tenant.
A global role can one of the following:
- User role: Assigned to end users, granting permissions to access APIs and features.
- Machine-to-machine (M2M) role: Assigned to M2M apps, granting permissions to access APIs and features, including Logto Management API.
Please note that these two types of roles cannot be mixed or updated after creation. Assign users or M2M apps to the role, depending on its type.
Create global roles in Logto Console
- Go to Console → Roles.
- Click Create role.
- Provide:
- Role name: A clear, descriptive name for the role (e.g.,
admin,viewer,billing-manager). - Role type: Choose between User or Machine-to-machine (M2M). Only machine-to-machine (M2M) roles can link to Logto Management API.
- Description: A brief description of the role’s purpose (e.g., "Admin role with full access", "Viewer role for read-only access").
- Assign permissions: Select the permissions (scopes) this role should have from the available API resources. You can update permissions later as needed.
- Role name: A clear, descriptive name for the role (e.g.,
- Click Create role to save.
Assign users or M2M apps to global roles
- Go to Console → Roles.
- Click on the role you want to assign users or M2M apps to.
- For User roles, click the Users tab; for M2M roles, click the machine-to-machine apps tab.
- Click Assign users or Assign M2M apps.
- Search for the users or M2M apps you want to assign to this role.
- Select the users or M2M apps and click Assign.
Default global roles
You can set one or more global role as default roles for new users. Default roles are the automatically assigned roles when the users are created, either for the self-sign-up or created through Management API. You can enable this toggle by going to “General” tab on the detail page under Console > Roles.
Configure organization roles
Create organization roles in Logto Console or via Management API to group permissions that apply within each organization. Organization roles are defined in the organization template.
An organization role can be one of the following:
- User role: Assigned to end users within an organization, granting permissions to access APIs and features.
- Machine-to-machine (M2M) role: Assigned to M2M apps within an organization, granting permissions to access APIs and features. This role cannot link to Logto Management API as it is organization-specific.
Please note that these two types of roles cannot be mixed or updated after creation. Assign users or M2M apps to the role, depending on its type.
Create organization roles in Logto Console
-
Click Create organization role.
-
Provide:
- Role name: A clear, descriptive name for the role (e.g.,
admin,member,billing-manager). - Role type: Choose between User or Machine-to-machine (M2M). Only machine-to-machine (M2M) roles can link to Logto Management API.
- Description: A brief description of the role’s purpose (e.g., "Admin role with full access", "Member role for basic access").
- Role name: A clear, descriptive name for the role (e.g.,
-
Click Create role to save.
-
In the Assign permissions modal, select the organization permissions and/or API resource permissions this role should have. You can update permissions later as needed.
Assign users or M2M apps to organization roles
Since organization roles are organization-specific, you need to assign users or M2M apps to organization roles within an organization context.
- Go to Console → Organizations.
- Select the organization you want to manage.
- For User roles, click the Users tab; for M2M roles, click the machine-to-machine apps tab.
- If the user or M2M app is not already a member of the organization, click Add member or Add M2M app to add them to the organization. During this process, you can assign them to one or more organization roles.
- If the user or M2M app is already a member, click the three-dot menu next to their name and select Edit organization roles.
- In the opened modal, select and save the organization roles you want to assign to the user or M2M app.
Just-in-time (JIT) provisioning
You can also assign organization roles to users or M2M apps at the time they join an organization. To do this, please see Just-in-time (JIT) provisioning.
Enforcing authorization in your backend or API
Logto issues JSON Web Tokens (JWTs) that contain the necessary claims to enforce authorization in your application or API.
To enforce authorization, your backend or API should:
- Require the client to present a valid access token in the request header with the
Authorization: Bearer <token>format. - Validate the access token to ensure it is issued by Logto, not expired, and has the required permissions (scopes) for the requested action.
- Respond with an error (e.g., HTTP 401 Unauthorized or HTTP 403 Forbidden) if the token is missing, invalid, or does not have the required permissions.
For step-by-step and language-specific guides, see How to validate access tokens.
Integrate Logto RBAC with your application
You can integrate Logto RBAC into your application using one of two approaches:
- Logto SDKs: Use a Logto SDK for built-in authentication and authorization flow handling.
- Standard OAuth 2.0/OIDC libraries: Use your preferred OAuth 2.0 or OpenID Connect library to implement the necessary flows.
Once integrated, request access tokens with the right parameters for your chosen RBAC model. Add the access token to the Authorization header in your API requests to enforce permissions.
See the implementation guides in the model sections above for step-by-step examples.
Advanced scenarios
Explore more sophisticated RBAC use cases in Logto:
- Combining global and organization roles: Assign both to users/clients when needed; Logto will resolve based on the requested token context.
- Multiple apps: Use shared resources and scopes for cross-application RBAC.
- Dynamic permissions: If needed, combine RBAC with runtime checks (e.g., ownership, attributes) for advanced scenarios.
- Custom token claims: Use custom claims to enrich tokens as needed.
Best practices & common pitfalls
- Principle of least privilege: Grant only the permissions each role needs.
- Avoid permission sprawl: Keep your permission model simple and maintainable.
- Review and update roles/permissions: Regularly audit your RBAC model as your product evolves.
- Separation of duties: Create distinct roles for sensitive/admin actions.
- Test RBAC in staging: Validate permission boundaries and escalations.
FAQs
How do I update roles or permissions across all organizations?
Update the organization template for global changes; existing organizations can inherit updates.
Can I change roles/permissions dynamically?
Yes, roles and their permissions can be updated at any time.
What happens if I remove a permission from a role?
Users/clients with that role will lose the permission immediately for new tokens.
How can I audit who has what role?
Use the Logto Console or API to list role assignments.
Can roles and permissions be assigned via API?
Yes, both the Console and Management API support managing roles and assignments programmatically.
Further reading
Organization template Customizing token claims How to validate access tokens Protect global API resources Protect organization (non-API) permissionsProtect organization-level API resources